Baremetal
All about baremetal configuration and tweaks!
- Configuring Traefik as a Modern Reverse Proxy for Odoo
- Guía para instalar Portainer CE en Kubernetes con almacenamiento persistente usando local-path-provisioner en Arch Linux
Configuring Traefik as a Modern Reverse Proxy for Odoo
As modern web applications become increasingly containerized, managing traffic across multiple services, domains, and versions can quickly spiral out of control. That’s where Traefik, a dynamic reverse proxy and load balancer, becomes a game-changer.
Over the past few weeks, I’ve been working on deploying multi-tenant Odoo environments (v15 to v18) using Docker. I needed a solution that could:
- Dynamically route traffic based on subdomains
- Handle HTTPS via Let’s Encrypt automatically
- Support longpolling and websocket traffic (used by Odoo's real-time features)
- Scale with minimal maintenance
The answer? Traefik.
What is Traefik?
Traefik (pronounced traffic) is a modern reverse proxy and load balancer designed for microservices. It automatically discovers services via Docker, Kubernetes, Consul, and more, and configures itself on the fly.
Unlike Nginx or HAProxy, Traefik is truly dynamic — it adapts to your containers and services as they spin up or down. It also integrates tightly with Let’s Encrypt for automatic TLS/SSL.
Case: Odoo Instances and Clients
Imagine this scenario: you manage multiple clients, each using different versions of Odoo (e.g., 15, 16, 17, 18). You need to ensure high availability and secure access for all of them. While Nginx is a solid reverse proxy, Traefik offers a more dynamic, automated approach that can significantly reduce configuration time and ongoing maintenance.
So lets start with the basic configuration!
Folder Structure
Organize your project like this:
project-root/
├── traefik.yml
├── acme.json              ← should exist and have chmod 600
└── dynamic/
    ├── dynamic_routes.yml
    └── middlewares.yml
Create acme.json before you start:
touch acme.json
chmod 600 acme.json
traefik.yml
entryPoints:
  web:
    address: ":80"
    http:
      redirections:
        entryPoint:
          to: websecure
          scheme: https
  websecure:
    address: ":443"
    http:
      tls:
        certResolver: letsencrypt
        options: default

providers:
  docker:
    exposedByDefault: false
    network: odoo-router-net
  file:
    directory: /etc/traefik/dynamic/
    watch: true

certificatesResolvers:
  letsencrypt:
    acme:
      email: admin@example.com
      storage: /etc/traefik/acme.json
      httpChallenge:
        entryPoint: web
Breakdown of traefik.yml
This file defines the static configuration of Traefik — the part that sets up how Traefik listens for requests, discovers services, handles SSL certificates, and loads dynamic config files.
entryPoints
entryPoints:
  web:
    address: ":80"
    http:
      redirections:
        entryPoint:
          to: websecure
          scheme: https
- web listens on port 80 (HTTP).
- It automatically redirects all HTTP requests to HTTPS, ensuring secure connections by default.
  websecure:
    address: ":443"
    http:
      tls:
        certResolver: letsencrypt
        options: default
- websecure listens on port 443 (HTTPS).
- TLS is enabled using Let’s Encrypt and a default security profile.
- This is where secure traffic lands, including browser requests to your Odoo sites.
providers
providers:
  docker:
    exposedByDefault: false
    network: odoo-router-net
- Docker provider automatically detects containers and routes based on their labels.
- exposedByDefault: false means services must opt-in via labels, increasing security.
- network: odoo-router-net ensures Traefik can reach services in that Docker network.
  file:
    directory: /etc/traefik/dynamic/
    watch: true
- The file provider loads routing rules and middleware from dynamic .yml files in /etc/traefik/dynamic/.
- watch: true makes Traefik reload config automatically when you edit those files (e.g. dynamic_routes.yml, middlewares.yml).
certificatesResolvers:
  letsencrypt:
    acme:
      email: admin@example.com
      storage: /etc/traefik/acme.json
      httpChallenge:
        entryPoint: web
- Sets up Let's Encrypt integration.
- Automatically requests and renews SSL certificates for your domains.
- Certificates are saved to acme.json (should be chmod 600).
- Uses the HTTP challenge to verify domain ownership (Traefik listens on port 80 to complete the verification).
TLS Options
You reference options: default, so you should also define:
tls:
  options:
    default:
      minVersion: VersionTLS12
      cipherSuites:
        - TLS_ECDHE_RSA_WITH_AES_128_GCM_SHA256
        - TLS_ECDHE_RSA_WITH_AES_256_GCM_SHA384
        - TLS_ECDHE_RSA_WITH_CHACHA20_POLY1305
This enforces modern, secure encryption protocols and disables older TLS versions (like TLS 1.0/1.1), reducing risk from outdated clients.
dynamic/dynamic_routes.yml
http:
  routers:
    client1-http:
      rule: "Host(`client1.example.com`)"
      service: odoo-v15-http
      entryPoints:
        - websecure
      tls:
        certResolver: letsencrypt
      middlewares:
        - secure-headers
        - rate-limit

    client1-longpolling:
      rule: "Host(`client1.example.com`) && PathPrefix(`/longpolling`)"
      service: odoo-v15-longpolling
      entryPoints:
        - websecure
      tls:
        certResolver: letsencrypt
      middlewares:
        - secure-headers
        - rate-limit
  services:
    odoo-v15-http:
      loadBalancer:
        servers:
          - url: "http://odoo15:8069"

    odoo-v15-longpolling:
      loadBalancer:
        servers:
          - url: "http://odoo15:8072"
dynamic_routes.yml: Dynamic Routing Configuration
This file tells Traefik how to match incoming requests to services running in your Docker environment. It defines:
- Routers: Match incoming requests based on domain and path
- Services: Define where those requests should be forwarded (to which container + port)
- Middlewares: Apply security headers, rate limits, etc.
routers Section
client1-http:
  rule: "Host(`client1.example.com`)"
This router catches HTTPS requests to client1.example.com and forwards them to odoo-v15-http.
client1-longpolling:
  rule: "Host(`client1.example.com`) && PathPrefix(`/longpolling`)"
This router specifically handles Odoo’s real-time longpolling requests (used for chat, live updates). This ensures that /longpolling is routed to port 8072, which Odoo uses for push communication.
entryPoints:
  - websecure
Specifies that both routers accept HTTPS traffic.
tls:
  certResolver: letsencrypt
Tells Traefik to automatically issue and manage SSL certificates for this domain using Let's Encrypt.
middlewares:
  - secure-headers
  - rate-limit
Adds security headers and request throttling for each route.
services Section
odoo-v15-http:
  loadBalancer:
    servers:
      - url: "http://odoo15:8069"
Routes the main UI/API traffic to Odoo’s port 8069.
odoo-v15-longpolling:
  loadBalancer:
    servers:
      - url: "http://odoo15:8072"
Routes longpolling (bus) requests to port 8072 — essential for features like live chat, POS sync, or notifications.
Why Separate Routers?
- It improves performance and clarity by letting Traefik route longpolling traffic separately.
- Enables better control: you could assign different middleware, rate limits, or timeouts for /longpolling.
http:
  middlewares:
    secure-headers:
      headers:
        browserXssFilter: true
        contentTypeNosniff: true
        frameDeny: true
        sslRedirect: true
        stsIncludeSubdomains: true
        stsPreload: true
        stsSeconds: 31536000
        referrerPolicy: "strict-origin-when-cross-origin"
        customResponseHeaders:
          X-Robots-Tag: "none"
          X-Permitted-Cross-Domain-Policies: "none"

    rate-limit:
      rateLimit:
        average: 100
        burst: 50
- middlewares.yml: Adding Security amp; Traffic Control
- This file defines middleware rules that Traefik applies to incoming HTTP requests. Middleware allows you to add features like security headers, rate limiting, authentication, and more — without modifying your app code.
secure-headers Middleware
secure-headers:
  headers:
    browserXssFilter: true
    contentTypeNosniff: true
    frameDeny: true
    sslRedirect: true
    stsIncludeSubdomains: true
    stsPreload: true
    stsSeconds: 31536000
    referrerPolicy: "strict-origin-when-cross-origin"
    customResponseHeaders:
      X-Robots-Tag: "none"
      X-Permitted-Cross-Domain-Policies: "none"
This adds a suite of HTTP headers to improve security:
- XSS protection: Helps block malicious scripts
- Clickjacking prevention: Denies rendering inside iframes (frameDeny)
- Content sniffing protection: Prevents MIME-type confusion
- HSTS: Enforces HTTPS via Strict-Transport-Security
- Referrer policy: Controls what info gets sent in the Referer header
These headers are especially important when exposing admin panels or user portals.
rate-limit Middleware
rate-limit:
  rateLimit:
    average: 100
    burst: 50
This throttles requests:
- Allows 100 requests per second on average
- Bursts up to 50 extra requests during short spikes
- It’s a simple way to prevent abuse, reduce load, and mitigate brute-force or DDoS-style attempts.
Applying Middleware
In your dynamic_routes.yml, reference these like so:
middlewares:
  - secure-headers
  - rate-limit
This way, all requests go through your defined middleware before reaching Odoo.
Running Traefik with Docker Compose Once you’ve defined your traefik.yml, dynamic_routes.yml, and middlewares.yml, the final step is to bring Traefik to life using Docker Compose. This step launches Traefik and connects it to your Docker network and dynamic config files.
The docker-compose.yml for Traefik
services:
  traefik:
    image: traefik:v3
    container_name: traefik
    restart: unless-stopped
    command:
      - --configFile=/etc/traefik/traefik.yml
    ports:
      - "80:80"       # HTTP
      - "443:443"     # HTTPS
    volumes:
      - /var/run/docker.sock:/var/run/docker.sock
      - ./traefik.yml:/etc/traefik/traefik.yml:ro
      - ./acme.json:/etc/traefik/acme.json
      - ./dynamic:/etc/traefik/dynamic:ro
    networks:
      - odoo-router-net

networks:
  odoo-router-net:
    external: true
Running Traefik
Once everything is in place, simply run:
docker compose up -d
This command:
- Starts Traefik
- Watches your Docker containers (if configured with labels)
- Loads routing rules and middleware from the /dynamic folder
- Automatically issues and renews HTTPS certificates via Let’s Encrypt
Conclusions
I've always enjoyed managing bare-metal servers and exploring ways to automate and streamline my workflow — whether that's writing scripts or using graphical tools when it makes sense. In that journey, I discovered Traefik as a powerful alternative to traditional proxies like Nginx.
What stood out to me most is how maintainable and automation-friendly Traefik is. With dynamic routing, built-in Let's Encrypt integration, and seamless Docker support, it significantly reduces the manual overhead of managing reverse proxies in complex multi-service environments — like multi-version Odoo deployments.
Guía para instalar Portainer CE en Kubernetes con almacenamiento persistente usando local-path-provisioner en Arch Linux
1. Preparación en Arch Linux (nodos del cluster)
El provisioner local-path usa un directorio en el nodo para almacenar datos persistentes. Por defecto usa /opt/local-path-provisioner.
Pasos:
- Asegúrate que en cada nodo físico o VM de tu cluster exista el directorio:
sudo mkdir -p /opt/local-path-provisioner
- Otorga permisos de escritura para evitar problemas de acceso:
sudo chmod 777 /opt/local-path-provisioner
2. Instalación del provisioner local-path en Kubernetes
Este provisioner permite que PVC con StorageClass local-path funcionen, creando volúmenes persistentes usando el directorio de cada nodo.
Ejecuta:
kubectl apply -f https://raw.githubusercontent.com/rancher/local-path-provisioner/master/deploy/local-path-storage.yaml
Esto crea:
- Namespace
local-path-storage - ServiceAccount, Roles y ClusterRoles para el provisioner
- Deployment del provisioner
- StorageClass
local-path
3. Verifica la instalación y que el provisioner esté corriendo
kubectl get pods -n local-path-storage
kubectl logs -n local-path-storage <nombre-del-pod-local-path-provisioner>
kubectl get storageclass
Debes ver el StorageClass local-path y el provisioner corriendo sin errores.
4. Establecer local-path como StorageClass por defecto (opcional)
Si deseas que los PVC usen local-path por defecto, ejecuta:
kubectl patch storageclass local-path -p '{"metadata": {"annotations":{"storageclass.kubernetes.io/is-default-class":"true"}}}'
5. Crear PersistentVolumeClaim (PVC) para Portainer
Archivo pvc-portainer.yml:
apiVersion: v1
kind: PersistentVolumeClaim
metadata:
  name: portainer
  namespace: portainer
spec:
  accessModes:
    - ReadWriteOnce
  resources:
    requests:
      storage: 50Gi
  storageClassName: local-path
Aplica el PVC con:
kubectl apply -f pvc-portainer.yml
6. Instalación y despliegue de Portainer CE
Usando Helm (recomendado):
helm repo add portainer https://portainer.github.io/k8s/
helm repo update

helm upgrade --install --create-namespace -n portainer portainer portainer/portainer \
    --set persistence.storageClass=local-path \
    --set persistence.size=50Gi \
    --set image.tag=lts
Usando YAML (alternativo):
kubectl apply -n portainer -f https://downloads.portainer.io/ce-lts/portainer.yaml
7. Resolución de problemas comunes
-
Si el PVC queda en estado
Pending, verifica que:- El provisioner local-path esté corriendo correctamente.
- El directorio
/opt/local-path-provisionerexista en todos los nodos y tenga permisos adecuados. - No exista un PVC previo con configuración incompatible (en ese caso, elimina el PVC y vuelve a crear).
-
Para eliminar PVC problemáticos:
kubectl delete pvc portainer -n portainer
kubectl apply -f pvc-portainer.yml
- El pod de Portainer puede quedar en estado
Pendingsi el PVC no está enlazado a un PV.
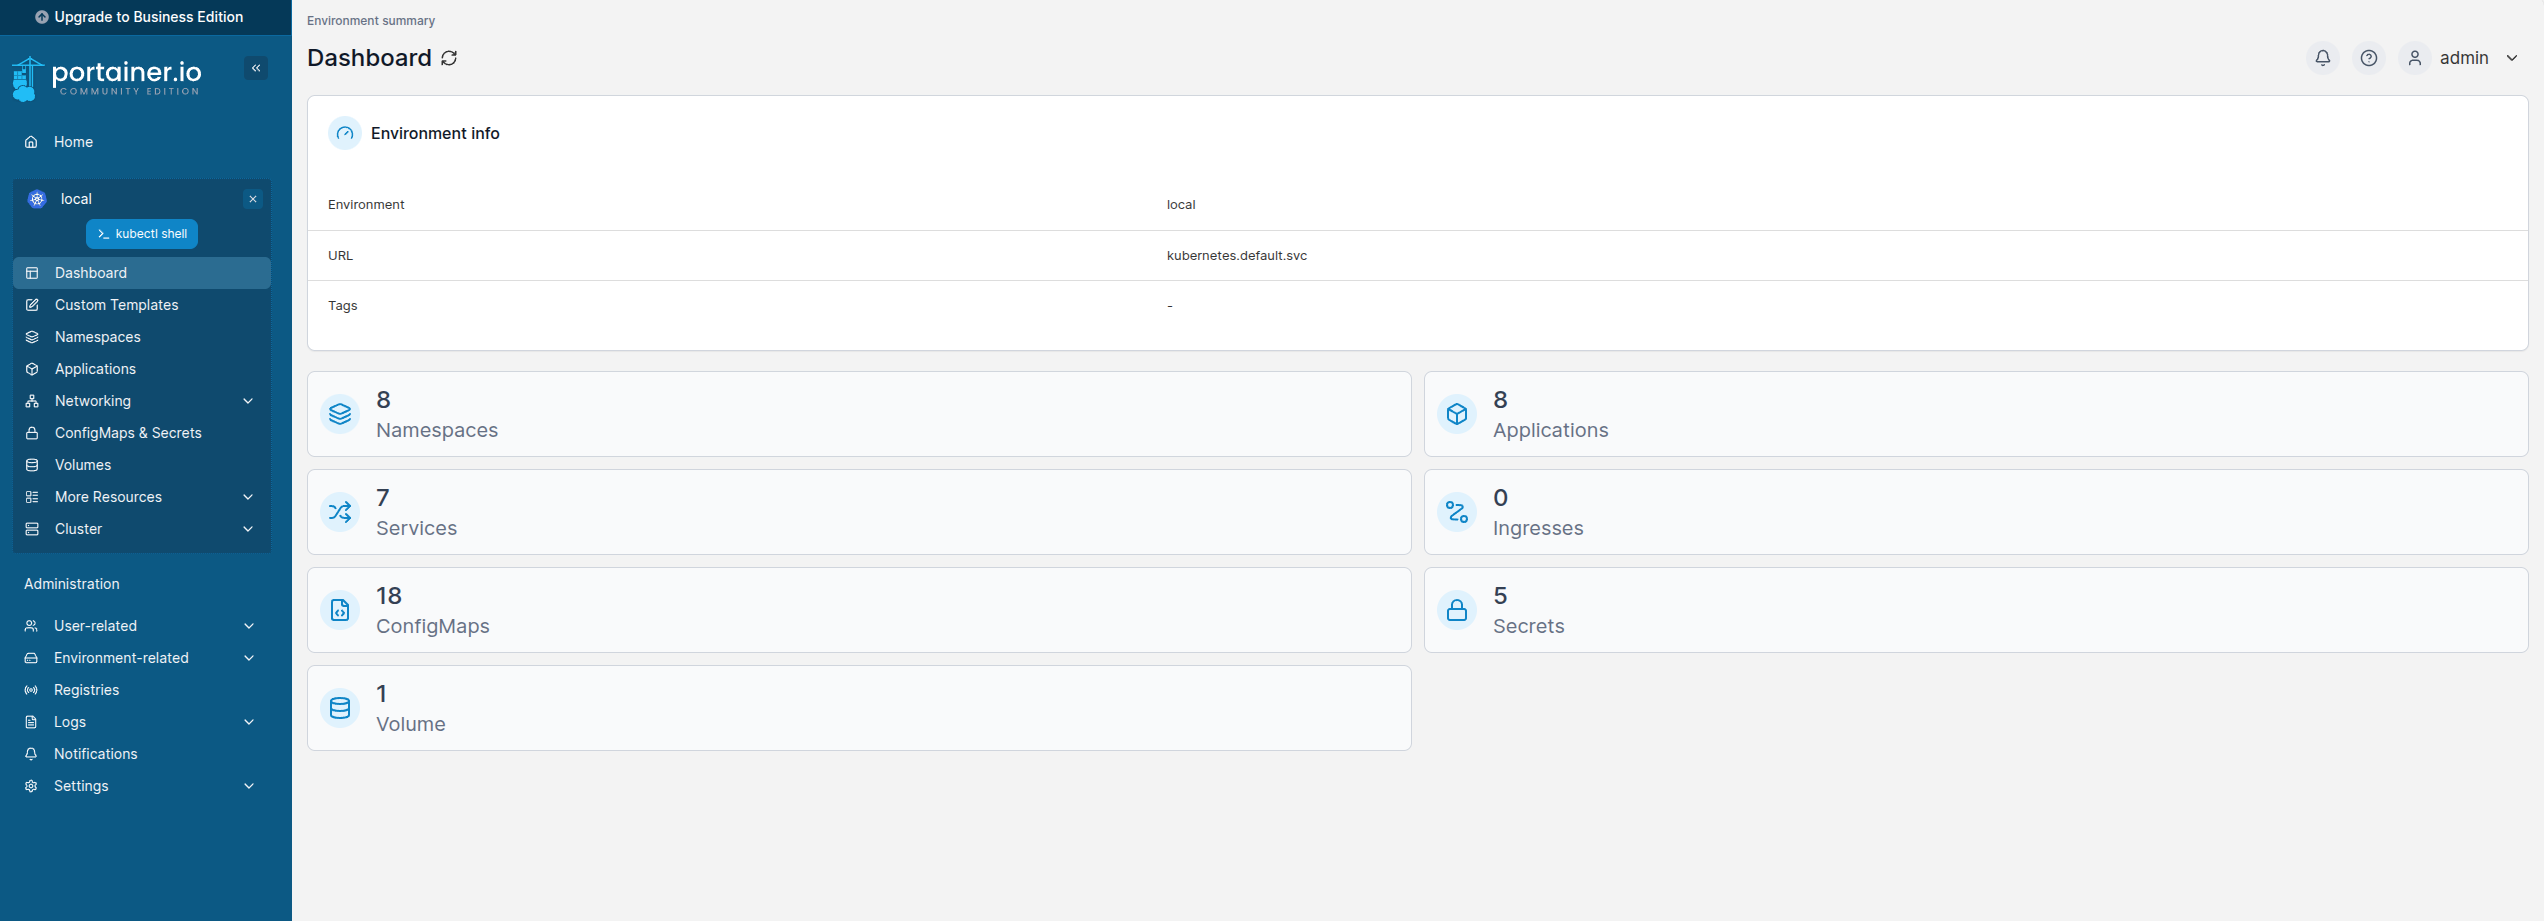
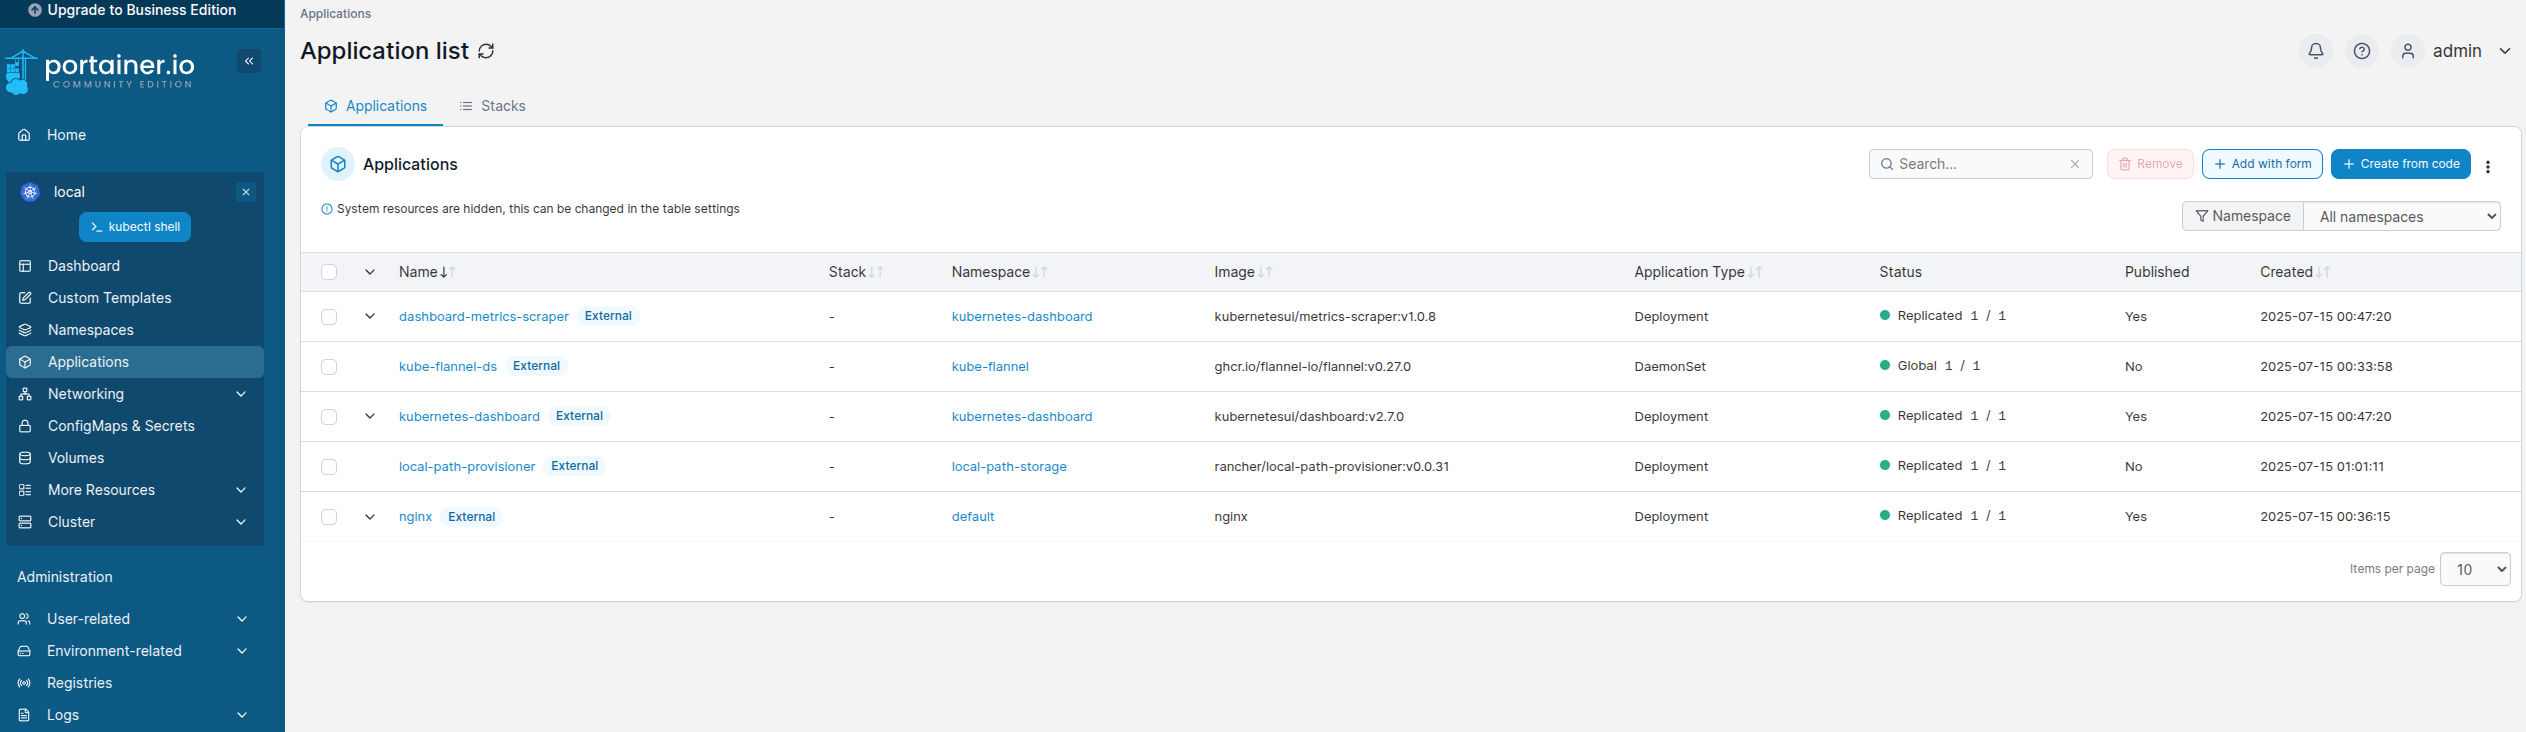
8. Verificación final
- Revisa el estado de los pods y servicios:
kubectl get pods -n portainer
kubectl get svc -n portainer
- Accede a Portainer a través del navegador con la IP del nodo y el puerto NodePort asignado (por ejemplo,
https://<IP-Nodo>:30779).
Resumen de comandos útiles
# En cada nodo físico o VM
sudo mkdir -p /opt/local-path-provisioner
sudo chmod 777 /opt/local-path-provisioner

# Instalar provisioner local-path
kubectl apply -f https://raw.githubusercontent.com/rancher/local-path-provisioner/master/deploy/local-path-storage.yaml

# Verificar provisión
kubectl get pods -n local-path-storage
kubectl get storageclass

# Opcional: hacer local-path storageclass default
kubectl patch storageclass local-path -p '{"metadata": {"annotations":{"storageclass.kubernetes.io/is-default-class":"true"}}}'

# Crear PVC para Portainer
kubectl apply -f pvc-portainer.yml

# Instalar Portainer con Helm
helm repo add portainer https://portainer.github.io/k8s/
helm repo update
helm upgrade --install --create-namespace -n portainer portainer portainer/portainer --set persistence.storageClass=local-path --set persistence.size=50Gi --set image.tag=lts

# Alternativa: instalar Portainer con YAML
kubectl apply -n portainer -f https://downloads.portainer.io/ce-lts/portainer.yaml

# Si es necesario, eliminar PVC problemático
kubectl delete pvc portainer -n portainer
Arquitectura de la infraestructura
Al final los servicios quedan de esta forma!
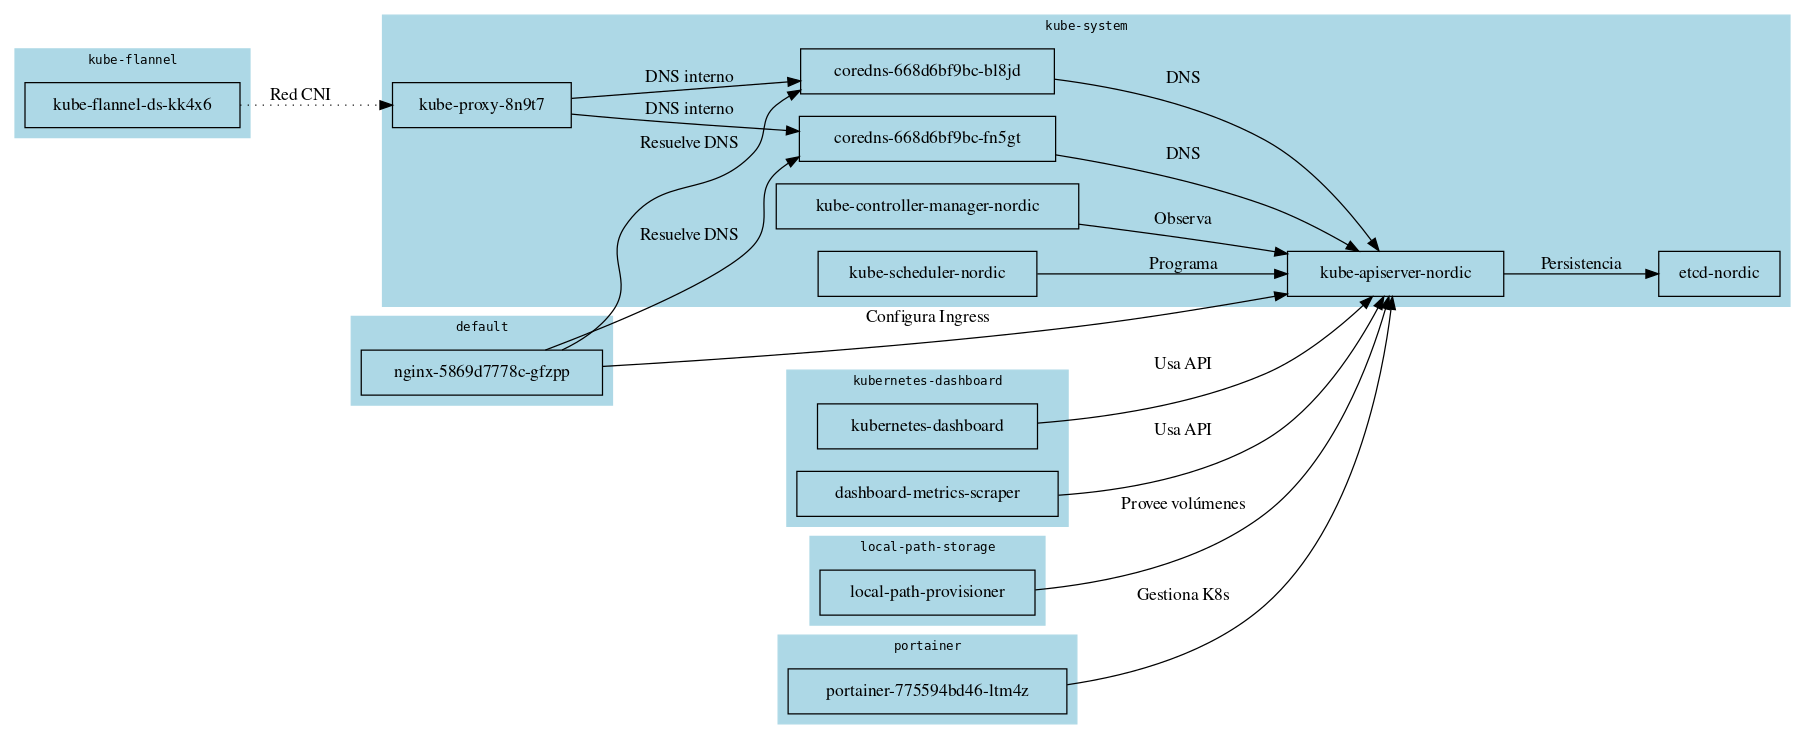
Y listo tenemos el servicio de portainer corriendo en nuestro baremetal.